Author Topic: Tudor Manor - A work in progress  (Read 12849 times)

Offline Justindo

  • Playmo Master
  • *****
  • Posts: 2045
  • Gender: Male
Re: Tudor Manor - A work in progress
« Reply #40 on: June 13, 2010, 03:22:58 »
This is turning into a spectacular manor, Emma! :)
:egypt: :roman: :viking: :knight: :arrr: :indian: :cowboy:

Offline Wolf Knight

  • Playmo Guru
  • ******
  • Posts: 11186
  • Gender: Male
Re: Tudor Manor - A work in progress
« Reply #41 on: June 13, 2010, 07:31:41 »
slowly blooming with life....

Offline Giorginetto

  • Playmo Master
  • *****
  • Posts: 7853
  • Gender: Male
  • Playmobil Aficionado
    • TheGiorginetto channel
Re: Tudor Manor - A work in progress
« Reply #42 on: June 13, 2010, 19:39:22 »
Nice work !!!!
:knight: Steck is Holy . Bring back more steck sets and its guardians , the Nuremberg Guards :knight:

Offline Emma.J

  • Playmo Addict
  • ****
  • Posts: 578
  • Gender: Female
    • Emma.J Blog page
Re: Tudor Manor - A work in progress
« Reply #43 on: June 14, 2010, 14:56:08 »
The need for more widows pt1

As I've said at the beginning of this topic the main problem with the steck window walls is they have a moulded return on them so they can only go at the end of a building. This limits the size and a shape of any new builds unless your happy to mix castle steck in with the Tudor sections. Most off the time that's ok but for this project I want a traditional timbered looking house.

So how to add extra windows, I've tried the drop down roof and it didn't look right. The next option is to get out the saw and do a bit of DIY!


As you can see (just about  :lens:) I have plain walls along the inside of the U and above the window. The side walls are fine as many original Tudor house have very plain sides. But I wanted a window above the door which would look better from the front and from the back would make the corridor more like a long gallery.


This is Little Morton Hall a National Trust house near where I live. Here you can see the side walls are all filled in on the right. It does have small windows running lengthwise on the left side and is was this I tried to copy.

I decided to go mad  :o and cut a hole into one of the solid Tudor wall sections I had. These are hard to get over her in the UK so I had to think twice about doing it but I had one wall with a couple of tabs missing so I gave it a go.

Sadly no pictures of the process


As you can see having turned a window sideways it fits very well in that location. It's actually in back to front, this was to cover the rough edge inside with the window frame, and also meant I didn't have to cut through the outside "beams" around the window to counter sink the frame in.
Add a bit of greenery and Bob's your uncle!

Improvise, adapt, overcome ..... If all else fails FAKE IT!

Offline WarriorOfToys

  • Wargaming Fanatic
  • Playmo Master
  • *****
  • Posts: 4547
  • Gender: Male
    • Come check out my Playmobil movies!
Re: Tudor Manor - A work in progress
« Reply #44 on: June 14, 2010, 17:19:05 »
I have an Umcle named Brian... but not Bob. ;)
(Pretty close though. ;D )

Awsome idea Emma!
I'll admit I was a little skeptical about the sideways window at first... :hmm:
Just didn't look right.
But with the greenery I can see why!!!
It is amazing, and I have grown "attatched" to the sideways window.
Steck is BACK! <:>

Offline Wolf Knight

  • Playmo Guru
  • ******
  • Posts: 11186
  • Gender: Male
Re: Tudor Manor - A work in progress
« Reply #45 on: June 14, 2010, 17:55:42 »
Emma this is amazing!! Good detailed work!!! I like the plant around the window!! I gives a sense of realism!!!

Offline flatcat

  • Playmo Master
  • *****
  • Posts: 4004
  • Gender: Male
Re: Tudor Manor - A work in progress
« Reply #46 on: June 14, 2010, 17:57:01 »
This is just looking amazing, Emma! - and I just love your custom window with all the greenery growing over :wow: :wow: :wow: :wow: :wow:
 

Offline playmofire

  • Klicky Firemeister
  • Playmo Guru
  • ******
  • Posts: 10952
  • Gender: Male
    • Copt Hewick Volunteer Fire Brigade - probably the world's smallest fire brigade!
Re: Tudor Manor - A work in progress
« Reply #47 on: June 14, 2010, 18:26:48 »
This is really amazing, Emma, great work and wonderfully recorded!   :clap: :clap: :clap: :clap:  The new lengthwise window with the creeper looks just the job and could be original Playmobil.

To save your precious blank walls, if you take the door and window Tudor wall it isn't too difficult to turn the doorway into a window space.  I haven't actually completed this conversion because of other non-PM demands on time, but I did get as far as a dry run with it.  It is also possible to make blank Tudor walls without too much work using the open frame walls.  Here's a link:

http://www.playmofriends.com/forum/index.php?topic=2183.0
“Today well-lived makes every yesterday a day of happiness to remember and every tomorrow a vision of hope.”

Offline Emma.J

  • Playmo Addict
  • ****
  • Posts: 578
  • Gender: Female
    • Emma.J Blog page
Re: Tudor Manor - A work in progress
« Reply #48 on: June 14, 2010, 19:13:21 »
Flooring

Sorry if you've just read my other topic about flooring this will be a bit of a repeat to start with.

I wanted some sort of base for my house so I could furnish it and be able to move it around and not knock everything over when I did. I thought of a a piece of board etc but they never look right so I toyed with the idea of just a large modern base connected together with the house just sat on top.

It was while asking peoples opinion on the small Victorian shop bases that Richard mentioned the old train station set and it's black floor. Now I'd seen it on ebay but not actually having some I didn't give it much thought until Richard said it would work and by golly it works well  :woohoo: :woohoo: :woohoo:

This is the link to the db site (all praise to Heather she is a God send  :wow: :wow: :wow: )
4300 - Main Station]http://playmodb.org/cgi-bin/showinv.pl?setnum=4300]4300 - Main Station

It is 4300 station and I've used the end base plate No.30 03 966 and middle base plate No.30 03 968. The parts click together nicely and give a black rim around the whole house.

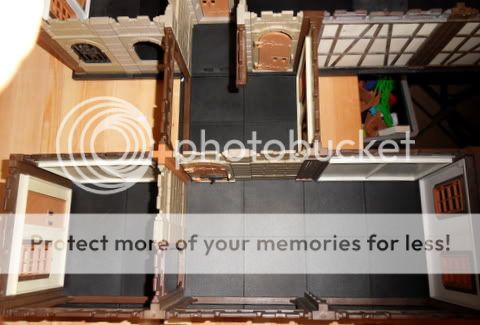
Now these parts were only designed to go around a rectangular building and as mine is a H I've had to cut a few bits out where the walls join at right angles.


As you can see they've got an interlock edge down the long sides and a raised rim top and bottom. It's this rim I've had to cut through. The first two in the above picture have opposite top corners cut down. With a close up below.


So everywhere there's a T join on the centre of the building I've had to cut a pair of floors down, with an extra set having to be cut out because of the way the stair wall an cupboard are.

So at last .......big drum roll....... here is the present layout of the ground floor, front of the building to your right. Kitchen at the bottom, hall top right with chapel behind.


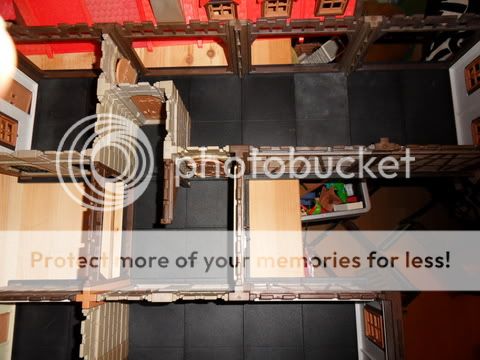
The second floor and my big feet!  8}


Now I started this post several hours ago and had to nip out part way so I can at last answer some of your other replies.

....
I'll admit I was a little skeptical about the sideways window at first... :hmm:
Just didn't look right.
But with the greenery I can see why!!!
It is amazing, and I have grown "attatched" to the sideways window.

I know what you mean Warrior it does need some thing around the window I could really turn it the other way around or move it high without losing the original beam frame around 3/4 of the window. Else where it would have just looked more odd.


.....To save your precious blank walls, if you take the door and window Tudor wall it isn't too difficult to turn the doorway into a window space.  I haven't actually completed this conversion because of other non-PM demands on time, but I did get as far as a dry run with it.  It is also possible to make blank Tudor walls without too much work using the open frame walls.  Here's a link:

http://www.playmofriends.com/forum/index.php?topic=2183.0

Thanks Playmofire, I'll check out that thread next. The reason my last post was the need for windows pt1 was, I was going to come back later and show off my experiments first but you've beaten me to the punch line.

When I cut the section out from the blank wall I hung onto the bits ( really so I could maybe melt the plastic and use it as a filler  ??? ) So the other night I had the idea to use it to fill in a door wall and this is what I got.

I cut down the extra white part to fit the bottom of the door frame.


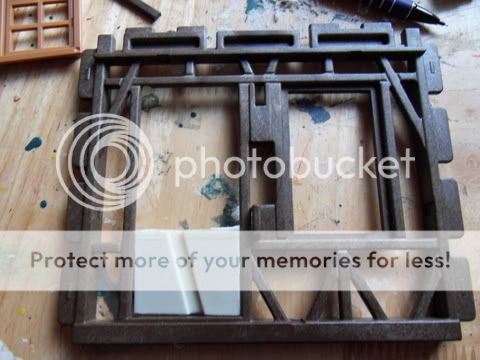
I had to then cut out a lip around the top of the white bit so the window frame would fit in.


At first glance it's not bad but as you can see I've got a gap down one side. If I get the time I could try filling this with the last small bit of white plastic I've got left. But It doesn't look wonderfull from inside but I may have a way to disguise it later!


Oh and it really needs a bit more beam running under the window, I did have a bit but it's temporally lost  :-\
Improvise, adapt, overcome ..... If all else fails FAKE IT!

Offline playmofire

  • Klicky Firemeister
  • Playmo Guru
  • ******
  • Posts: 10952
  • Gender: Male
    • Copt Hewick Volunteer Fire Brigade - probably the world's smallest fire brigade!
Re: Tudor Manor - A work in progress
« Reply #49 on: June 14, 2010, 19:22:42 »
I used white Plastruct strip to go under the window and down the side of the door opening and foamboard(?) for the blank wall section (also this on the whole blank wall in the custom).  I'll see if I can find my custom window wall as far as it got and post a pic or two.
“Today well-lived makes every yesterday a day of happiness to remember and every tomorrow a vision of hope.”