Author Topic: Steck Identification Guide  (Read 27040 times)

Offline Wesley Myers

  • Playmo Master
  • *****
  • Posts: 1825
  • Gender: Male
Steck Identification Guide
« on: May 16, 2013, 01:09:20 »
I had previously written this and posted it on Laughing Giraffe.  I said I would put it on here and here it is. 


Steck Identification and Comparison Guide

With the rerelease of some olde Steck buildings and parts I think it is important for collectors and enthusiasts to be able to identify what is what.  Is it really an original Olde House or is it something some unscrupulous money-maker put together to sell as an original in order to satisfy his satanic temptation to greed?!

To start, we shall look at stone wall pieces.


The piece on the left is the 2nd Generation of Steck and the piece on the right is the 1st Generation of Steck.  What is the most obvious is the “bump” on the connecting tabs.  The old piece does not have them.  This “bump” helps increase the width of the piece ensuring a tighter fit.  The 1st Generation pieces become loose after a while and will just fall apart with slight pressure.

(NOTE - as you are looking at them – I will use this method of “right” and “left” for all my subsequent pictures)


Here is a close up of the tabs.  You can see the “bump” in detail. 
Another key point to note is the ENTIRE mould has been redone!  It is not just the connecting tabs but the whole piece.  This is true for all the Steck stone wall pieces.

You can see the stones themselves are more square at the corners, the surface texture is different, with the 1st Generation ones being a rougher texture. 

The dimensions of the pieces are the same so they are interchangeable.  Something Playmobil needs to be commended for – it is one of their guiding principles – to have pieces from one set work with pieces from another. 

Offline Wesley Myers

  • Playmo Master
  • *****
  • Posts: 1825
  • Gender: Male
Re: Steck Identification Guide
« Reply #1 on: May 16, 2013, 01:10:34 »
Crenulations

Now we will look at crenulation pieces.  Here the difference is the most obvious.  The new one being on the left and the olde one being on right.   


There is no comparison here with the new one being SO much nicer, in my opinion, to the olde!  The depth of the piece is apparent in the above pictures.  The scallops adding detail are also a beautiful touch. 
Even though they are so different in appearance, they are interchangeable and can be used together.  This is one part that cannot be disguised. 
On a slight aside, I think the 1st Generation piece is quite attractive in its simplicity.  It adds an unique appearance to the structures it is used on and gives variation.


Buttresses


Here you can see the “bumps” on tabs quite clearly.  You can also see some other marks on the tabs (small mould pin release mark and part number) on the 2nd Generation one which is on the top.  Note the 1st Generation mould pin release marks on the buttress itself across from the connection tabs.
Like in all the 2nd Generation pieces, they have been completely redone.  You can see one of the main differences in sculpting with the small block at the bottom of the top tab and the one at the top of the bottom tab.  It is sculpted to stick out a lot farther than the olde one.

On all the Steck stone wall pieces the sculpting on the 2nd Generation ones is a lot more defined and sharp.

Another thing to note is the excess plastic that was not removed from the bottom tab at the factory on the 1st Generation piece.  You will not see this on 2nd Generation pieces.

Offline Wesley Myers

  • Playmo Master
  • *****
  • Posts: 1825
  • Gender: Male
Re: Steck Identification Guide
« Reply #2 on: May 16, 2013, 01:12:01 »
Female Wall Connectors


IMG_0202 by voiceofrevolt, on Flickr

Here you can see the ‘female’ connectors.  The 2nd Generation piece is on the top.  Note inside the openings the different spacers.  The olde ones only have the line spacers, while the 2nd Gen. ones have the “bumps” as well.  The sculpting on the 2nd Gen. one is also sharper.


From the front it is almost impossible to tell the difference between the two in the picture.  You can tell in person, though, with the rougher texture of the 1st Generation ones.


Stone Wall Corners

The sharpness of the new mould used for the 2nd Generation pieces shows on the top piece.  There also seems to be a difference in consistency of the plastic used.  That and the smoothness of the new mould give appearance differences.


It is on the inside of the pieces that we can really see the differences.  Basically the same differences as listed above on the female connectors.


Three Way Stone Wall Connectors


There are actually four different ones I have found.  The 1st Generation one is shown at the bottom in all the photos.  You can easily tell this is the 1st Generation one by the thickness and sharpness and by how far the skinniest of the blocks protrudes. The 2nd Generations ones are sharper in the corners and not as thick and they protrude farther from the rest of the wall.


These three photos show all three different connection areas so you can see the differences in the inner spacing.

To tell the difference between 1st Generation and the others note the thickness and sharpness of the small detail stones.

Offline Wesley Myers

  • Playmo Master
  • *****
  • Posts: 1825
  • Gender: Male
Re: Steck Identification Guide
« Reply #3 on: May 16, 2013, 01:13:56 »
Flooring Pieces

On these it is very easy to see the mould changes between 1st and 2nd Generation.  Yes, even these pieces were redone.


The 1st Generation one is shown on the right.  The most obvious and readily noticeable difference is on the hanging connection tabs.  They are much larger on the olde pieces. 


From this angle, I think the difference is easier to notice.

Not only did they remove the inner tab (it really isn’t necessary because the piece is supported at both ends) but they also significantly reduced the amount of plastic used in the 2nd Generation piece as can be seen in the lip of the piece.  Notice also that the supports that run the length of the piece on the underside also narrow quite a bit on the 2nd Generation one.  You can also see the mould pin release circles on the 1st Generation one quite clearly.


Now for another key difference – the Maker’s Mark. 

You will notice the 1st Generation one actually states “System”.  Yes, it does state “1977” – HOWEVER – that does not matter as 2nd Generation pieces, as will see, also state “1977”.  Whether it says “System” or not, is the key identifying factor – 2nd Generation ones never had (have – as they are still being produced!) the word “System”.


You can see here the bracing for the connecting tab that was removed from the full length floor piece – it is needed on the pieces that are braced against the wall and only held up one side.  Differences from 1st to 2nd Generation wall walkway pieces are the Maker’s Mark with “System” on them – mind you, only 2nd Generation sets come with the walkway piece with the hole in it for attaching siege defence equipment (the bigger one with the hole placed in the centre of it).

Offline Wesley Myers

  • Playmo Master
  • *****
  • Posts: 1825
  • Gender: Male
Re: Steck Identification Guide
« Reply #4 on: May 16, 2013, 01:16:23 »
Open Wall Pieces


You can see difference from 1st to 2nd Generation pieces with the inclusion of the “bump” on the tabs.

The same differences apply to the double width open wall pieces.

Roof Pieces

Even the roof pieces were completely remoulded from 1st to 2nd Generation Steck pieces. 


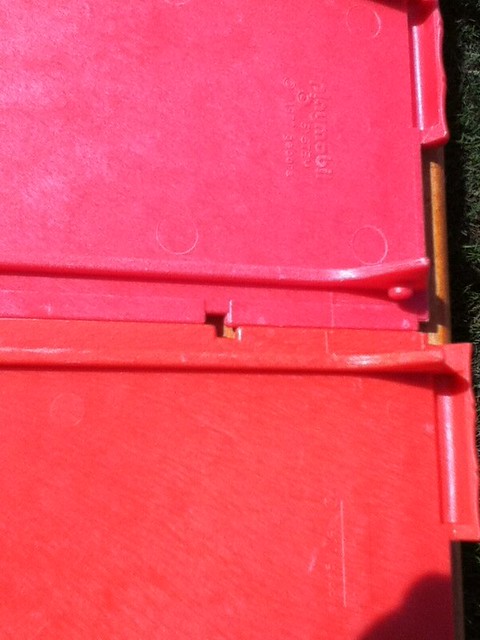
Here we can see the square roof piece that was used.  In the photos the colours look different (because they are) but I would not trust colour alone to be a valid determination of what is 1st and what is 2nd Generation.  While there is more consistency currently in colours (due to one single supplier of coloured plastic pellets) I am not sure when that may have occurred.  Mind you, I am not sure when the Steck pieces changed over from 1st to 2nd Generation either.  There appears to be some debate on this (Playmofriends) about when and it might well be that some pieces were remoulded in succession and even that old stock was used up where available and some sets could, conceivably, have included a mixture of parts.  One would have to talk with those were in positions to know such things at the factory at the time.

The exterior of the roof pieces looks to be identical but underneath is where we can tell the difference.


The image on the left is the 2nd Generation one.  You will note they BOTH state, “1977”.  However, the one on the right is the only one to state, “System”.  The 2nd Generation one also has the “boxes” to insert to the top tabs to hold it in place. 

Offline Wesley Myers

  • Playmo Master
  • *****
  • Posts: 1825
  • Gender: Male
Re: Steck Identification Guide
« Reply #5 on: May 16, 2013, 01:17:40 »
Roofing

Now we will look at the single roof section.

Again, the colour difference but among 1st Generation roof pieces the colours do vary, as they do among the wall pieces and as has been documented in this site (Original Discoloured Steck Walls - http://www.playmofriends.com/forum/index.php?topic=9178.0).  The 2nd Generation one is shown on the right (as you look at it) and appears more orange. 
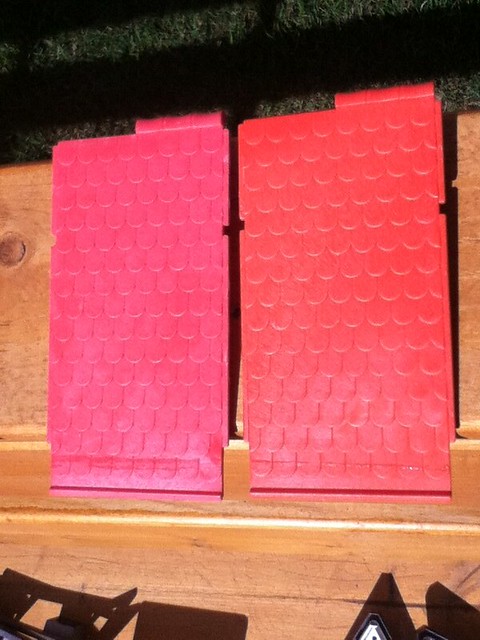


While looking at the underside of the pieces we can see the Maker’s Marks.  The one on the left is the 1st Generation one.  You can tell because it states, “System”.  Again, you will note they both state, “1977”.  You can also see the large mould release pin circles on the 1st Generation one.

They are interchangeable in all respects other than the Maker’s Mark. 


Roof Eave Section

While these may appear to be the same and are interchangeable they did change from one generation to the other. 
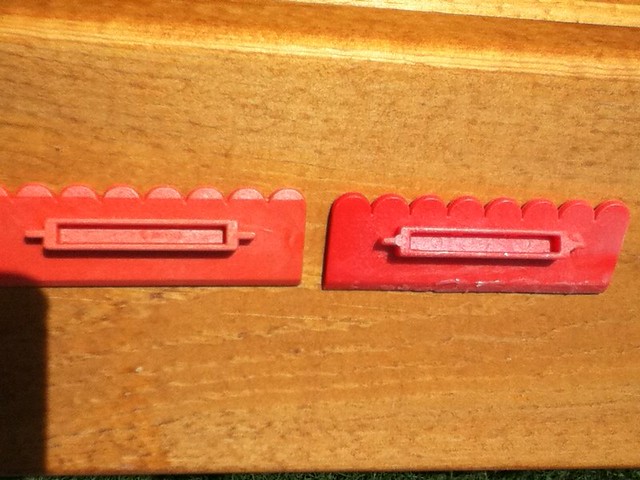


The real difference is the bevelled edge of the bottom row of the shingles and this can only be seen while looking under them.  I am not sure why this change was made (unless it was made to save on the amount of plastic used).  You can also see a part number stamped into the rectangular recess.  You can also see the pin release marks on the olde one on the sides of the rectangle.  As you may have figured out by now, the 1st Generation one is the one you can see on your left.


Flat Roofed Dormer Window
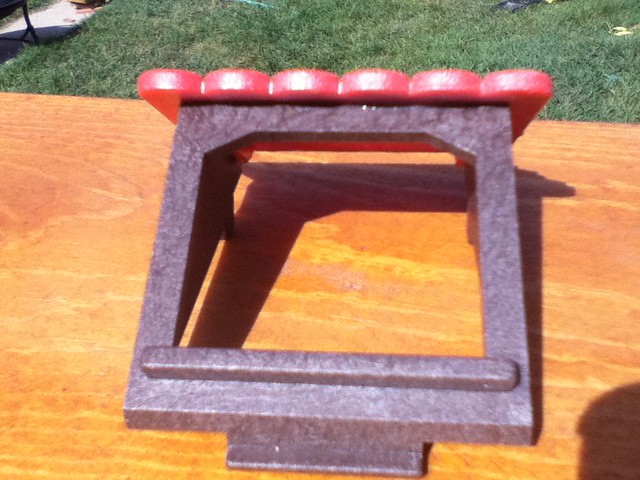


Here you can see the flat roofed dormer window.  You will notice the roof piece has the flat front to it – like the 1st Generation Eave Section.


Underneath is where you can (sort of …) see the Maker’s Mark – again it states, “System” (sorry about the blurry picture). 

I have not seen in person the new one that comes with the bakery and I would be interested in seeing it but I would presume it to not state, “System”.  I also wonder if it is bevelled like the 2nd Generation Eave Sections. (All the ones I have are 1st Generation ones so I don’t know what changes were made.)

For those who do not know, the double roof sections (both with window openings and with the opening for easy access to play) were only made in 2nd Generation form.

Offline Wesley Myers

  • Playmo Master
  • *****
  • Posts: 1825
  • Gender: Male
Re: Steck Identification Guide
« Reply #6 on: May 16, 2013, 01:18:56 »
Open Gable Ends

Even these changed from 1st Generation to 2nd Generation. 


As you can see in the picture above there are differences between the two.  The 2nd Generation one is on the left.  It can be seen with two holes on the downward angled bracing below the cross member that is just below the pulley.  I am honestly not sure why these holes are present – I doubt it is for reducing the amount of plastic, it looks as if it was designed so there could be parts attached but I am unaware of any parts that do attach in these slots.
You can also see that the 2nd Generation one does not lie flat like the 1st Generation one does.


This picture illustrates why – there is an extension from the back of the pulley on the 2nd Generation one.  This makes it more functional when actually used as hoist.

Like the stone wall pieces, the texture of the 2nd Generation one is smoother than the 1st Generation one.


Non-Open Gable Ends


Here you can see the backs of two half-timbered gable ends.  They look pretty identical.  However, the 2nd Generation one is the one on the left with the six-pane window.  Telling features are the notch at the bottom of the 2nd Generation one that is off-set (I am not sure why it is off-set) and the recess for the pulley at the top of the gable is greater (to save plastic, I guess).  Another plastic reduction feature can be seen along the sides of the white insert.


Here is a close-up of the 2nd Generation half-timbered gable end – it shows the date, “1977”.  The olde ones I have have no date stamped on them.

Offline Wesley Myers

  • Playmo Master
  • *****
  • Posts: 1825
  • Gender: Male
Re: Steck Identification Guide
« Reply #7 on: May 16, 2013, 01:20:37 »
Half-Timbered Walls

The half-timbered wall sections are one of the most-loved pieces Playmobil has ever made.  This is demonstrated by the fact they have been in production, almost unchanged, since 1977.
Note the “almost unchanged” part. 


Here is a detail of the original Bakery (3441) wall.  You can see it states, “System”.  I have not seen a detail of the new one, but I would bet it only says, “1977” and the word, “System” is not present.  (Well, since I wrote this I did see a review of the Bakery online done by ‘Skywalker’ on Playmofriends and the wall does, indeed, state ‘Playmobil System’.  It must be due to the rush in production of the item.  However, I am not sure if this was such a good idea for obvious reasons previously stated.)


The only solid walls I have are also olde and they state ‘Playmobil System’ on them.  I would think the new ones probably state, “Playmobil, 1977”, but I have not seen them yet.


On all of the side wall pieces is stamped, “AD – MCMLXXVI” – Anni Domino (“Year of our Lord” in Latin) 1976.  The new ones have this stamp as well.  In the picture the olde one is pictured at the back (the Bakery wall) and the new one, obviously, in the front.  You can see the excess flash that has not been trimmed along the edge of the top of the olde one.


Chimney

The original chimneys do not have a Maker’s Mark on them at all.  I suspect this is due to the moulding process.


Offline Wesley Myers

  • Playmo Master
  • *****
  • Posts: 1825
  • Gender: Male
Re: Steck Identification Guide
« Reply #8 on: May 16, 2013, 01:22:20 »
Doors and Gates

These too have changed from 1st to 2nd Generation. 


The new one is the left and the olde one on the right. 

The most obvious differences are the hinges.  On the 1st Generation ones the hinges were moulded into the frame of the door.  The obvious problem with this is the fact that once one breaks that is it.  While the new one has hinges that can be inserted so if they break.  Even breakage is lessened as the hinge itself is not of the same ABS plastic as the wall piece but a softer plastic.


This next photo (above) shows some of the differences between the two generations.  You can see the insertable hinge area quite clearly.  You can also discerne the bumps on the tabs.  You will see smaller mould pin release marks.  You will also see that the new one has ‘PS’ stated in the mould pin release mark.  I am unsure of the reason for this. 

Even the doors themselves, while upon first glance look the same, are different.  The new one’s moulding is sharper (note around the hinges) as well, the hinges themselves are similar but the 1st Generation ones are sharper at the points that sweep back decoratively.  The new door also has a parts number stamped into it.

If you also look at the top of the door frame on the olde one, you can see there is even detailed sculpting representing the stone pieces.  The new one does not include such extra details but does have more detail around the frame itself.


The detail differences between the gates are basically the same, except for the obvious major differences (as can be seen below).


The gate opening is not really any different in size, but the crenulations above it are.  This does make for a much more imposing piece.  The scallops on the new gate do a lot to it, in my opinion.  However, mixing and matching the olde and the new can create wonderful displays that appear different but in essence use the same parts.  Again, with Playmobil, creativity can make it even more wonderful.

I hope this guide helps people to learn a bit more about Playmobil and the impressively wonderful building system of Steck.

Offline Kate

  • Playmo Fanatic
  • **
  • Posts: 110
  • Gender: Female
Re: Steck Identification Guide
« Reply #9 on: May 16, 2013, 02:05:30 »
Excellent guide!  I'm going to have to go check on mine.